Wednesday, January 2, 2013

Here's looking to 2013!

I am looking forward to a new start with the new year. I hope everyone had a nice holiday and got a bit of rest. I was able to work on a few of my projects, didn't finish any but got close.

 I am not one to make resolutions, but this year I am going to sew more, finish some of my unfinished projects and blog more!  I know, I know, I don't have a very good track record, especially with the blogging part, but I can dream can't I? I'll give it a good go and just take it week by week and see how I do. I'll post what I have been working on as I go, so for a start, here is a sneak peek...


No, it is not a forest of dotted trees in the snow... I have a few more to make and then I can put it all together.

Until then... HAPPY NEW YEAR!!!!

Thursday, September 27, 2012

Finally finished something!

Well, I finally finished up this pincushion I started way back when. If you read my earlier post you will see that I had made a different one from this same pattern company. This one has a little bit more items to sew on it but was not hard at all to make. Only thing I don't like about it, is that I used some polyfill to hold the sand in where I closed it and it just feels squishy on that side. No sand gets in that area. I may just open it back up and remove the polyfill. Will see... In the meantime, here is a picture of it and also the pattern I used. Next on my list is to finish up the rest of the owls from a prior post. Have a good day everyone!!


Saturday, July 21, 2012

Barely here!

Hi! Its been a long HOT summer so far. Now monsoons have set in and its just plain MUGGY!! I know I have really let this blog go but somehow everything else has just kept me too busy from getting some of my projects done. So... I wanted to share a couple of pincushions that I did a bit ago. I made these for a local quilt shop called The Quilters Market here in Tucson. Both of these pincushions were made from patterns by Heather Bailey. She has the cutest stuff! When making these pincushions, I found the Pear alot easier to make than the turtle. I could not quite get the stuffing right in the neck of the turtle so it is a bit wrinkled, but it gives it character! Until next time, Stay cool!!


This is a pear pincushion


This is a turtle pincushion, isn't it cute?!


Monday, January 30, 2012

One month down, 11 more to go!

One month down, 11 more to go! This month just flew by didn’t it? I have been busy working on a few projects simultaneously, which is never a good idea. Why? Because neither of them get done and it seems like they take forever to complete! I need to stick with one and see it to completion but I think I get bored and then start another one. So I have been jumping back and forth with them. I did however, make some valentine cards (oops! another project thrown in there). Every year our church has been donating valentine cards to the Veterans Hospital here in Tucson and then they hand them out to the Veterans on Valentine’s Day.

I wanted to use my stamps but I could not find anything “valentine” enough. My next thought was to use a heart shaped punch, but…  I do not own one of those either.  After a bit of looking I came across my Quickutz squeeze and surprise! Heart shaped dies! Quickutz used to be its own company but from an internet search its looks like they have joined the forces of lifestylecrafts.com.  

When using the Quickutz, it is best to use paper with an adhesive back because some of the pieces are so small it is hard to put adhesive on with an adhesive runner. I used a glue pen called Quickie Glue. It worked great when I wanted to apply small controlled amounts of glue to hold those cut outs down. The last thing I used to add a little punch to the card was Glossy Accents. I just carefully applied it to the top of my hearts and then let it dry. I think they turned out great!

I stamped the tree and sewed over the hearts

You can see how shiny the heart is from the glossy accents

This is what it looks like

Well, those are my cards! I like the simplicity of them and that they say “valentine” without all the mush. I don’t know who will be receiving them so I wanted them to be generic. The inside message says “Happy Valentine’s Day! Thank you for serving our country!  That is it for now, I will continue to work on my projects and keep you updated! Have a great day!

Thursday, January 5, 2012

New Year, New Beginnings, Thank goodness!!


HAPPY NEW YEAR! Here we are again at the beginning of another year. This year I plan to not spend as much on fabric and supplies, I want to use what I have on hand. As my husband says, we are the afterhours craft store. I am also going to try and post here a bit more often. I know, I know I said that before… new beginnings right?  Okay enough of that, I have to share with you a few quick things that I did get finished up in time for Christmas!

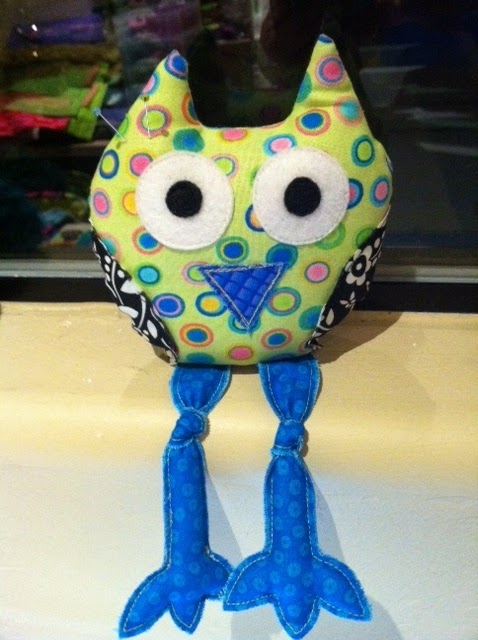
First thing I made was this cute pincushion owl. I started out by making 4 of them at once but only 1 completed the flight. I am sure the others will eventually get there. I got this pattern off of a website called The DIY Dish . It is an online crafting show hosted by twins! I still can’t tell them apart, but they do have the cutest crafts and ideas. Check them out! I am sure you will enjoy watching them as much as I do.


The lucky owl who left the nest!

Still waiting for the other owls : (

Another thing I made was a little Sassy chick scissor fob! Isn’t it cute!!  Sitting next to it is my Sassy chick pincushion that I used to teach at a local quilt shop The Quilter Market .


One Sassy Chicken

I fell in love with this pattern when I saw it at the Quilt basket . It is from a company called Hatched and Patched . I was surprised at how super easy it was. The best part was I used what I had on hand! I filled it with decorative sand I bought from Lowe’s. I like using sand as it makes it a bit heavier and the bitty grains will help keep your needles clean.

Lazy Daisy Pincushion
Last thing I managed to complete was this adorable moose! The pattern is from Carol’s Zoo  (Read one of my prior posts and you can see the Hippo I made!) Her patterns are pretty easy and always two or three pieces. The time to make this one said “1 hour” on the front of the pattern. It took me at least that long just to cut the pattern out! Maybe I was just being extra careful and methodical. I recommend she just leave the time to make it off completely. Then no one will feel inadequate if it takes them longer. She does have great instructions and even tells you how to stuff your plushy, so make sure you read it all the way through before you start. Isn’t this moose just adorable!

Mr. Moose!
Time to start on some new projects! I’ll keep you posted!! (But just in case? Please don’t hold your breath ha ha ha) Wishing you all the best in this coming new year!

Thursday, October 20, 2011

Hungry Hippo

Wow! I can't believe how fast time flies! Seems like I just posted on here yesterday and a month has gone by already!  SO I must be busy right? ha ha ha... 

I have been wanting to share with you a hippopotamus that I made using a pattern from Carols Zoo ( www.carolszoo.com). 


I was surprised how easy it was to sew together. Took me about 4 hours to make this cute fella. That includes all the breaks and distractions, it would be so much less if I sewed this straight though.  Don't you just love how the ears came out?? I did have to give it plushie surgery right away because I put the tail in the wrong place to begin with. Not very common to see a tail coming out on top of a hippos back! Don't you just hate it when you do something like that? Needless to say, my older daughter came and snatched her up right away. I still have a few of Carol's animal patterns to sew up. I'll post them hear as I complete them. So until next time, have a sew wonderful day!!

Saturday, September 24, 2011

Oh my floral heart!


Here is my latest completed project! This heart would make a cute house warming gift or a sweet baby gift. Best of all, it  was quick and easy ! This is a kit I bought from one of my favorite quilt shops here in Tucson, http://www.sewingroomtucson.com/ .  The pattern is from Bird Brain Designs, check out their site for some really cute and fun stuff! http://www.birdbraindesigns.net/  Also, be sure to sign up for their email updates. They include a free redwork pattern every now and then. Okay, getting a bit side tracked, back to the project..

Tip I have for you is to be a little bit patient in cutting out the flowers. Need to take it slow when going around the tight curves so you do not nip off any petals! French knots are used in the center of the flowers to hold them into place. I must admit, I was also always afraid of making french knots. But after this project,  I got pretty good at making them!  I would suggest maybe doing a few practice ones before actually trying them out on the project. I jumped right in there with my french knots and the first few I had to pull out and if one looks closely, you can see how some are smaller (first ones I tried) and some are bigger (got better as I did more and more). If you need help learning how to make french knots or other types of embroidery stitches "The Embroidery Stitch Bible" by Betty Barnden is great! The illustrations are very easy to understand and I love that it is spiral bound so it can lay flat for easy use.

I picked up this book and also these great scissors (by Clover) at the Quilt Basket (aka The Sewing Room) http://www.sewingroomtucson.com/ in Tucson. What I like about these scissors is that the blades are serrated. Which wakes cutting wool so much easier as it keeps the wool from slipping. I also like the they are only 5 1/2 inches long so it makes getting around those corners really easy.


Wow! This is my longest post yet! I better get back to my next project so I can share that with you! Hopefully it won't be so long before I post again. Of course, if I find any new gadgets I will share those with you too!