Since I was making two, I changed the second one up just a little bit by adding a flower instead of the horseshoe.Monday, September 22, 2014
Western pincushions! Yee haw!
Every year I go to a sewing camp held by the Quilters Market at the famous Tanque Verde Ranch here in Tucson, Az. I enjoy presenting our camp counselors with a new pincushion every year. This year I decided to use wool in my project. I wanted it to be a memento of camp this year and used some icons typical to the southwest and ranch living. I also added some decorative stitching and made a crazy quilt layout on the pincushions.
I filled them with crushed walnut shells that I bought from the local pet store. I love the added weight it gives them and the texture from the walnut shells help keep needles clean. I am currently working on another wool pincushion, I will post that as soon as I am done with it. But if you haven't figured me out yet, I like to work on multiple projects at once so in time it will be done. Have a great day!!
Tuesday, September 16, 2014
A resting spot
I saw these neat phone / tablet holders on Pinterest. Ooooo I want one!! So I looked into purchasing one and after seeing the price I thought "I can make that!". So I scoured the internet for a pattern and after seeing how much that cost I thought hmmmm "do I really want to spend that much on a pattern". I'm sure we have all been there. After more searching I found a free pattern. Yay!! I got to work on it right away. I wanted to use it with my phone, but it came out much bigger than I thought it would. It works great with my mini iPad though.
I'm not crazy about the large pillow in front but you can still view the screen just fine. Back to the drawing board. This time I measured my phone and figured out how big I wanted my phone stand to be and came of with this version.
Much better huh?! I also filled it with crushed walnut shells and a bit of polyester stuffing to keep the shape of the point. I do like this version much better, in fact, I have had a few request for some, so I will whip up a few more. That's it for today. Have a happy day!
Sunday, September 7, 2014
It's Halloween!
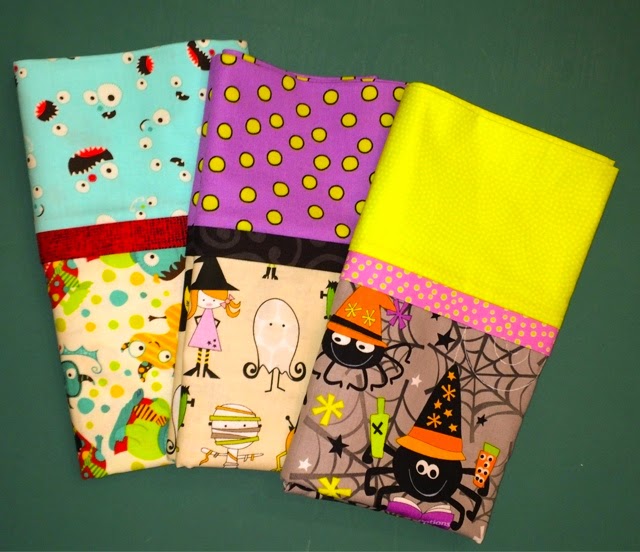
Disney has declared it Halloween season with the start of their Mickey's scary Halloween parties. Sooo... I thought it would be fun to make some Halloween themed pillow cases! My Daughter is currently in the Disney College Program Internship and is working at the Magic Kingdom. She absolutely loves it! I made these for her and her friends. I'm sending them now so they can enjoy them before Halloween is over. Hmmmm Christmas pillow cases next?
See the skull and cross bones? It's neat how they put those in there. I have to honestly tell you I did not notice it when I bought it. The next picture is of some cute ones that I think are so fun!
Making these pillow cases were actually quite easy. Just google "pillow case pattern" and you will get many to choose from. There are also handy videos also if you are more of a visual person like me. Here are some pictures of the ones I made.
I love the orange and black fabric, here is a closer look of the detail...
I have been working on a few other projects so I well post those when I get further along on them. In the meantime, have a great day!
Saturday, June 14, 2014
Grin and "bear" it
Okay okay I couldn't resist! My daughter wanted me to create a bear pattern for her. I searched through all of my patterns and couldn't come up with anything close to what she had in mind, so I had her draw up the initial bear shape she wanted and I did the rest. This is the second version, the first prototype was disassembled for pattern modifications. I used wool in this version, the ears and tail were glued on. The eyes are French knots and the nose is a satin stitch.
Side view of bear
Looking head on
The bear is only about 3 inches by 4 inches. Hope you like it!
Wednesday, May 28, 2014
Finished!
Hi all! Hope your having a good day. We have reached 100 degrees in our temperatures so the days of hot steering wheels are here. Over the weekend I was able to FINALLY get the binding sewn on. I have been putting this off for quite sometime. Only because I was not sure on what color I wanted to use. I think it turned out quite nice!
And here is the back, looks a bit like sherbert ice cream to me, which would be perfect for a hot day!
Here is a close up of the quilting. I have to say I didn't do the quilting. A wonderful quilter named Linda Powell did it for me. I love the flower pattern she used. Makes it perfect for a little girl.
The pattern I used for this quilt is called Yellow Brick road by Atkinson Designs. It uses fat quarters and stitches up pretty fast.
This finished quilt is on it's way to its new home. Until next time, eat some ice cream!
Sunday, May 11, 2014
Mother's Day
Today is Mother's Day here in the U.S. Wishing everyone who nurtures a child, friend, pet etc.. A happy day. I received a new charm for my bracelet and a wonderful 3D laser art piece. My daughter Amber cut it with the laser machine and little sis Ashley helped assemble it. I took some pictures, but they no where do it justice as seeing it in real life.
The view below shows how it was assembled in layers, 13 layers in all.
For my friend Renee, Mom and MIL I made some cards with stamps from "Stamps of life". The design came from a fellow stamp club member from the Stamps of life Gallery.
Until next time, have a great day and keep sewing!!
Monday, April 28, 2014
Pins pins pins
Hi all!
Hope you had a great weekend! My daughter has been making polymer clay dragons so I thought I would give it try and made up some cute pins. I have seen pins like this on different web sites and have even purchased a few for myself with the old adage of "I can make this!". But of course that usually does not happen, can you relate? Well I impressed myself and made up a few. They were actually quite easy to make. So here are my creations....
They turned out quite cute if I say so myself! There are many tutorials on the web and you can find the clay at a local craft store. I used a brand called sculpty (follow baking instructions on package) and then I put a shiny gloss glaze on it when done. Until next time! Keep sewing!
Subscribe to:
Posts (Atom)